Saturday, August 30, 2014

Killing time...

... waiting for Edana "Rhubarb" Quinn Womersley to arrive. Today we have sheep to tend and tomatoes to can. That should keep us busy enough.

Here, also to pass the time pleasantly, are some photos I was sent by an old friend this week.


This is a Norwegian mountain hut called the Hytte på Bandet, or the "hut on the saddle." We stayed there in 1984 while on an official UK military Joint Services Adventurous Training expedition called NORPED 1984, climbing the mountains all around. 

I'd lost my slides of this adventure after I loaned them to the expedition's organizers and they never returned them, but I was able to find my main climbing partner on the trip, former cadet David Balharry, through FaceBook, and he sent me some 35 mm slides to scan in. I'm pretty pleased to have them. 


This is the Hurrangane mountaiin range, somewhere high on the west ridge of Store Midtmaradalstind, looking north to Store Skagastølstind, AKA Storen for short, looking north and east.  

Store Skagastølstind is the main mountain we climbed, the second highest peak in Norway. It's called "Storen" or "the big one" for short. We climbed it using the ridge to the right, and descended via the face you see here, a series of scary abseils.

The rest of the slideshow is here on FaceBook.


And here's one I found in my den, my old passport picture from around the same era:


What a long face! I'm looking very sad because this was around the time of my demob. That was a tough time for me.

Tuesday, August 19, 2014

How to can a big batch of peaches efficiently

Today was not a day I was scheduled to work, and Aimee had earlier been to the Belfast Cooperative to bring home two of Peter Baldwin's pre-ordered bushel boxes of peaches which were now ripe enough for me to can, so I got on with it.

Most people new to canning would be nervous about doing quite so many at once, and worried about how much time it would take, but if you want to be self reliant it really is better to put up good solid quantities of staple and storage foods. It's surprising how much people can eat. Think in bushels, not pounds and quarts.

Although I started out rusty and slow, I quickly remembered all the tricks to getting it done efficiently. I should think that by far the most efficient technique would be some kind of assembly line in a larger community kitchen, with several people working at once. There are about eight distinct steps, so eight people would be best, and they could probably do as many as thirty bushels in a day if they had everything on hand.


First, put a large saucepan or kettle on to boil the hot water needed to peel peaches. A three gallon soup pan with about two gallons of water in it would be perfect. Then, while that heats up, gather up your peaches, which have to be ripe but still firm, and your other stuff: clean canning jars, lids and bands, sugar, and citric acid. 

Two cups of sugar in six cups of water with a teaspoon and a half of citric acid makes a good light syrup. I'm told you can use grape juice instead of sugar but I never do. You have to use the citric acid (or lemon juice) to stop the peaches from turning brown.


By now your pan of plain water should be boiling. Drop as many peaches in there as will fit, leave them in until the skin discolors just slightly and goes just a bit wrinkly, about thirty seconds if the water is properly hot. Even discolored or bruised fruit like the one above can go in. You'll cut the bruised part off later.

Pull the peaches out and drop them in a large bowl next to a cutting board. Now comes the trick or "knack." Take one and cut it in half, rolling the knife around the stone. With the skin still on, take one half in each hand and twist gently, slipping your thumbs between the two halves to pry them apart if need be. If you haven't under- or overheated them, the fruit should fall into two clean, even halves with the stone in one of the two. Pick the stone out by working your thumb or fingers underneath it. In about one in four or five pieces of fruit the stone will be broken in two. It may even be discolored or moldy. As long as you can clean it all out, don't worry about it. Be sure to scoop out or cut away any mold or fragments of stone.

You can now turn your attention to the skin. It should slough off easily in one or two large pieces. If it doesn't, pop all the fruit back in the hot water for a few seconds more until it does. Experiment using trial and error to find out the exact right amount of time it takes to slough the skin off each peach nicely. With the peaches we usually get, I notice that red skinned peaches peel more easily than yellow, but I suppose it depends on the variety of peach you have.

The whole process of skinning and stoning takes only a few seconds if you do it this way, stoning first, then skinning. The two halves will be much easier to grab with the skin on than off. There's also something about the twisting motion that is required to separate the two halves that also works most of the skin loose more easily than if you tackle a whole peach. Make sure you get all the skin off.

As you get each peach half clean and skinned, drop it in a clean canning jar. If your peaches are large, you will need wide mouth jars for peach halves, while peach quarters and slices can go in regular jars. I always use quart jars. Smaller ones just don't work that well. Peaches are too bulky.
 

Just stone, skin and pack a few jars at a time, unless you have help. Don't get ahead of the job. You don't want to leave too many open jars with uncovered peaches lying around for too long. Today I did batches of four jars at a time, just enough to use up a batch of syrup.

Add your sugar syrup/citric acid mixture to bring the total of peaches and syrup up to within one half-inch of the top of each jar. Wipe the top clean with a bit of kitchen towel so there is nothing to prevent the vacuum seal from forming and fit a clean lid and ring band.

Some books on home canning tell you to sterilize lids and ring bands, but I can't see how this makes the slightest bit of difference when the next thing that happens is that they are going to be in 212 degree F water for half an hour. Likewise, I don't sterilize jars. I just make sure they are washed thoroughly in hot water and rinsed.


Our water bath canner takes nine quart jars at a time. The water needs to be deep enough to cover the top of each jar, and it needs to be at a rolling boil before you put the jars in. You'll need to experiment with your stove to find the right gas or electric setting to maintain the boil without wasting energy. With our stove, which runs on propane, it takes the two middle-sized burners going full blast to heat the canner up to boiling, but once it is boiling, you can turn them both down a little. Once the jars are all in, wait for the water to start boiling again, which will take a while, then time the boil for thirty minutes.

These tips assume you are within a thousand feet of altitude above sea level. If you're higher up than this, consult the official USDA guide, which is available online these days. In fact, you should read the general sections of this guide, which is the authoritative manual, before you do anything.

Once the thirty minutes are up, pull the first nine jars out with tongs, or using the rack that came with the water bath canner, set them aside to cool, and replace them with nine more. Wait for this new batch to begin to boil, then time them for thirty minutes after that. After the time is up, let all the cans cool completely, then check the lids for a seal. The little domed top of each lid should be sucked down into the canning jar by a vacuum inside. It should feel taught if you tap it with a finger, not elastic or springy. As you set them aside too cool, space them widely apart so the air can circulate. Don't set them right next to one another, or they'll take much longer to cool down.

If the cans are sealed you can the remove the ring band, which is not required for storage once everything is sealed, and wash any sticky canning water off carefully, making sure not to disturb the lid, then put them in a dark cupboard or on a dark shelf. Any that are not sealed will keep for quite a while in the fridge.

If you go traveling with cans, say to deliver some to relatives or friends, you might like to put ring bands back on to protect the seal. But on the shelf at home they're not needed.


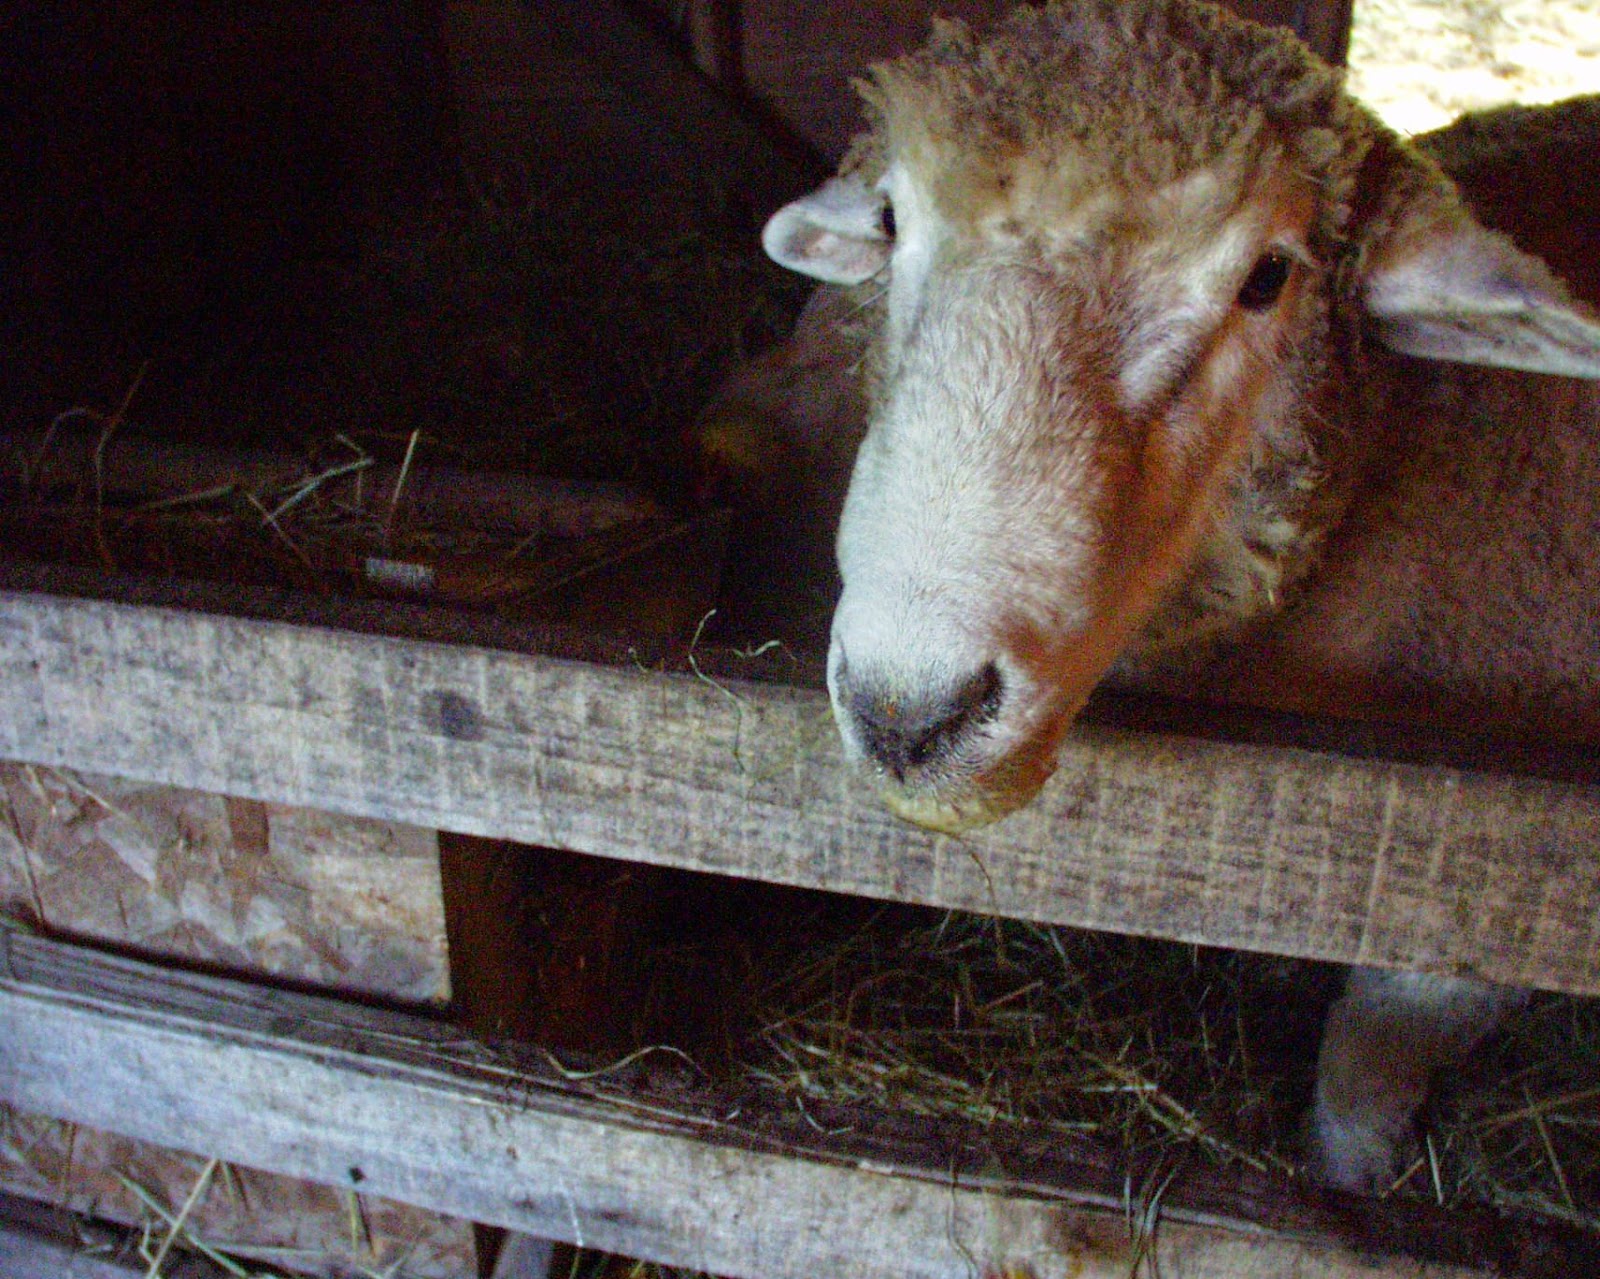
If you happen to have a lonely old ram, or a pig, they like to eat bruised peaches and peach fragments, while pigs and chickens love peach skins. Notice the peach juice dripping from Shawn's mouth, the silly old ram.


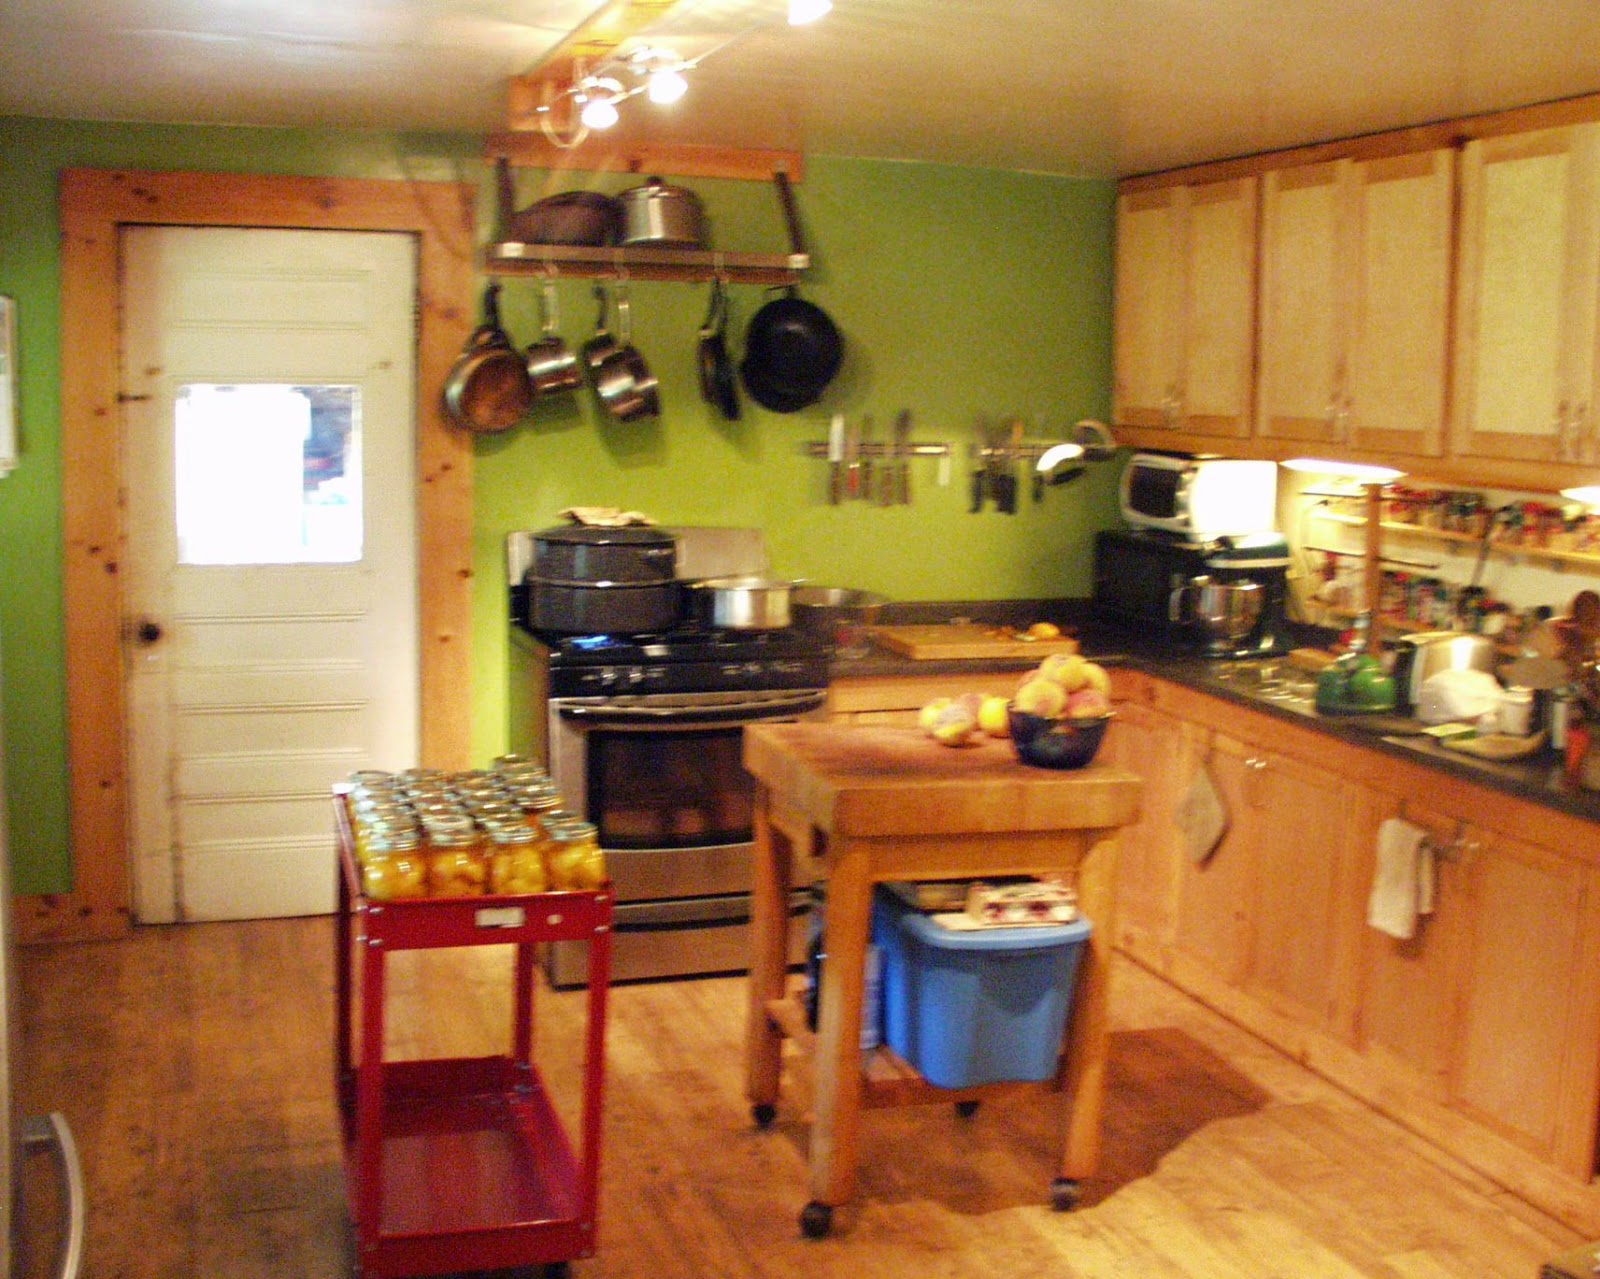
Here's the kitchen in full production. When we rebuilt this old farmhouse, we deliberately made a large kitchen so we could do this kind of thing more easily.


Here's about two thirds of what we made today. Summer sunshine in a jar to brighten up your winter!

Back to work!

Yesterday was my first day back at work after our summer break. It was mostly a day of catching up with colleagues new and old, and meetings. There was the fleeting pleasure of a brief trip to look at a field site, that involved about a quarter-mile walk, but the rest of the day was spent indoors and talking to people.

This is of course a major change of scenery after a long summer of being outdoors, farming, building and fixing cars and equipment, a time in which the main person I spoke to was Aimee. We won't count talking to the sheep or dogs, both of which I do most days.

I'm not bad enough yet to talk to my plants, although I imagine I will get there one day.

It was a surprising pleasure to talk to people. It always is. But I notice that it is very tiring to do it all day long. You get used to it, of course, and so by this time next week it won't be nearly as tiring. But in general, I can pull weeds or saw wood all day long and not be as worn out mentally as I get from this kind of professional conversation.

Aimee is now in her last week of pregnancy before the due date, which is next Sunday (24th August). She has entered a fairly stable daily pattern of eating, sleeping, taking little walks with the dogs, and -- for recreation and since she no longer likes to shop or travel -- she has decided to cook. A lot. She's making us a lot of food.

This last is surprising. I do most of the cooking around here. But Aimee is a good cook, probably a better cook than me much of the time. In the last day or two we've had enchiladas, pie, bread, whoopie pies (a Maine favorite and the Official State Treat), and she's also made a big batch of kraut.

She gets up late, maybe 8 or 9 am, gets online, checks her email and FaceBook, and then cooks. She cooks a little, then naps a little, then cooks a little. She may do a little light house cleaning too.

So this is a pretty easy way for a husband to get through the last week of a wife's pregnancy. I know how lucky I am. I've heard all the horror stories, all the stuff about how antsy women get when their time comes, how they can drive their husbands crazy.

Me, it isn't fair, I know, but I'm hoping for cheesecake.

Thursday, August 14, 2014

No power, no heat. (But it doesn't matter.)


The same fast, heavy rainstorm that caused flash floods on Long Island has knocked our power out. Not great timing, considering that my wife is pregnant and due any time now, and that I have an elderly relative that has had a medical emergency and taken to hospital in Great Britain, meaning I need to be able to get email and phone.

No worries, though. Many years ago I made provision for this kind of thing by investing in a 3,250 watt propane emergency generator. I went out this morning and started the generator and hooked it up safely, and we have power to most of the house.

It's a pull-start genny, and so harder to get going than our old electrical start, but it makes two pole 110/220v power, and so we can run anything we want to run in the house, even the dryer, welder or automotive lift, all of which are 220v.

Call me nuts, or a "prepper", but I can imagine needing to use the welder or auto lift one day, if I need to weld something on a car, truck or tractor and the power has been out for days.

We're unlikely to use the dryer. We'd normally use the laundry line or clothes horse and the heat from the woodstove.


Unfortunately, we can't use the woodstove right now. That's because I took the chimney apart yesterday. Luckily, it isn't yet cold this fall.

(That's right: it's fall already in Maine. Our statistical first frost is August 27th, and there are already some red maple leaves on some of our trees.)

I already had it on my list to sweep and inspect the chimney, a regular home safety chore prior to winter. I also had a good 48 inch chimney section, salvaged from the garage (after I sold the old wood furnace we no longer needed now the multi-year house insulation project was complete), with which I might make repairs, if need be.

Long ago this chimney was compromised by a poor installation job, thanks to an unethical local contractor, and an unresponsive and irresponsible manufacturing company. You can read the full sad story here. The damage was only to the outer layers of insulation and metal cladding. The inner liner of stainless steel was fine.

I solved the problem by wrapping the compromised chimney sections in two extra layers of galvanized steel. But every year, I inspect the compromised sections to make sure they are still usable.

This is what I found this year:


There are three compromised 48 inch sections like this. You can see that the connecting collar has become separated from the shaft of the chimney section, exposing the insulation.

Obviously this chimney is now completely unserviceable. I doubt it was ever dangerous, though, thanks to my earlier, ad hoc repair. The second and third additional layers of steel would have held the whole thing together and prevented dangerous heat reaching the fabric of the house.

But I think it's time for a new chimney. Especially with a baby on the way, we need a safe woodstove.

Accordingly I sourced chimney parts from a different manufacturer that would fit what is left of our original chimney. It took me a bit of luck and driving around but I found sufficient sections of suitable chimney to complete the repair in Bangor yesterday. Today I'll fit them carefully. 

Then I may package the broken chimney and send it UPS with a note to the original manufacturer. They've been bought out by a new company and may now be more responsible. Aimee is good at notes like that, and has often won refunds when I'd given up. Maybe she'd like to write it. We could even circulate the note and pictures on FaceBook. That might spur them into providing satisfaction.

In other news, Aimee made red cabbage kraut. Here's the kraut pot, with the weights that hold down the solid cabbage and keep it under the brine:
 

Five red cabbages made around two gallons of kraut. Tasty, and healthy too.

Tuesday, August 12, 2014

Jack fence


We had to take down the old fence around our "Back Forty" paddock when we built the extension. It was in the way. Later I put up temporary fence, but once the grass began to grow over the old excavation scars, it was time for permanent fence.

But the old one had given us so much trouble over the years, falling or being knocked down by sheep, especially rams, that I knew I needed a better design. A couple years ago we hit on the notion of using "cattle panels" for ram-proof fence, so we knew that these could hold up to the head butting that rams like to do. The panels get distorted after repeated hits, but they don't give.

Then this last winter we noticed that if the fence was tilted a little, the ram couldn't get a good run-up at it. He trips over the bottom wire before he can hit higher up with his head. Added to this consideration is the fact that our ground is rocky and that in many places bedrock or what Mainer's call "ledge" is right at or just below the surface. One idea led to another, and I came up with a fence design that used two cedar poles and cattle panels, seen above, a variant on the traditional western "jack fence." I had to drive to Levant, Maine, to get cedar posts, for two bucks apiece, and had quite the struggle to find cattle panels, but eventually everything was ready.

It sure goes up easily. On Sunday I built a couple hundred feet of it in a fairly short time space, about six hour's work.

Today we moved the sheep into the paddock to graze. They seem pretty happy with the new arrangement. The grass is fairly lush, having been give chance to grow.

The only unhappy animal was the ram, Shawn. This time of year he's in his own pen, where he'll stay until breeding season. The rest of the sheep used to be in the next paddock, and so they could "talk" through the fence. It was enough to stop him getting lonely. Now his buddies are gone.

I gave him some greens from the garden, but it was no consolation. But they'll be back before dinner time.


The garden is just getting into full production. We now get fresh tomatoes, cucumbers, beans and basil daily. carrots and potatoes are there for the digging. We are making plans for kraut.


All seems to be going more or less as planned, and the to-do list is nicely whittled.

Now, when's that baby due?

Saturday, August 2, 2014

Pesty and pesto


One of the big jobs on my revised summer honey-do list was a rebuilt staircase. The one we had, at 114 years old, was ugly and creaky and lacked a banister. Now we are likely to get house guests, it's important to have a safe staircase.

I began by assembling materials and putting polyurethane finish on treads and riser boards. Then I wrecked out the old staircase.

There was the usual moment of gagging and near-vomiting on encountering the obligatory 114-year old mouse nest, pictured for your viewing pleasure above. Yet more disgusting though was the decomposing dead rat. Rodents, unfortunately are a fact of life in an old Maine farmhouse. Both were soon dealt with, using appropriate arm's-length tools, and holding one's nose. Then I fitted the new risers and treads over the old staircase skeleton.


I'm not great at finish work, and in fact detest doing it, but was happy enough with the new stairs.


Meanwhile, Aimee was harvesting basil and processing it into pesto. She takes over the whole kitchen for this process, as well as the porch, which is where she picks the leaves. It's a lot of work for an eight-months pregnant lady.

I tend to avoid this process, mostly because of the big mess it creates, so I was glad enough to have my own job to do.


Big mess or no, the final product is delicious. This is just the first batch of Womerlippi 2014 pesto, about half of the total she will make. It gets frozen until needed, although quite a bit will be given away to relatives.


Meanwhile, I'd made cole slaw salad with our fresh cabbage, carrots, and onions. The potatoes are ready too.

This is the part of owning and keeping a farm I really like -- large amounts of very good, very fresh food.